Backing up TrueNAS Scale to OneDrive
Recently OneDrive was removed as a CloudSync provider for TrueNAS Scale. As I built my first NAS and use OneDrive for cloud storage, I was looking for alternate means to back up my NAS to OneDrive. I found individual pieces of possible solutions on the TrueNAS forums, but nothing approaching an end-to-end solution, so decided to do a write-up of what I ended up doing in hopes others may find it helpful as well.
TrueNAS Scale allows custom docker containers which they call “custom apps”, so the overall idea is just to use rclone in a Docker container. I like the solution because it’s decoupled from anything specific to TrueNAS, so very generic, easy to support, and there’s no “magic” involved. It’s very straightforward and understandable.
The first step is to create a new dataset which will contain your rclone configuration file. I named mine “rclone” in my root “Default” dataset. I used the SMB share type, since that’s what I plan on using, but left the rest of the settings as default.
Next you’ll need to configure the SMB share for the dataset so that you can manage the config file from other machines. For mine, I just added the SMB share to the /mnt/Default/rclone path and used the default settings. When creating a new share it’ll ask to restart the SMB service.
Connect to the new SMB share and create a single file inside called rclone.conf. This file should be in the INI and look like this:
[onedrivedavid]
type = onedrive
drive_type = personal
drive_id = <your-drive-id>
token = <your-token>
All configuration can be found in the rclone docs for OneDrive, but the boilerplate should be enough for most, so you just will need to fill in the two placeholders.
The section header is the name of the remote, so I used “onedrivedavid” since I plan to back up my wife’s data on the NAS to her OneDrive separately and wanted to disambiguate.
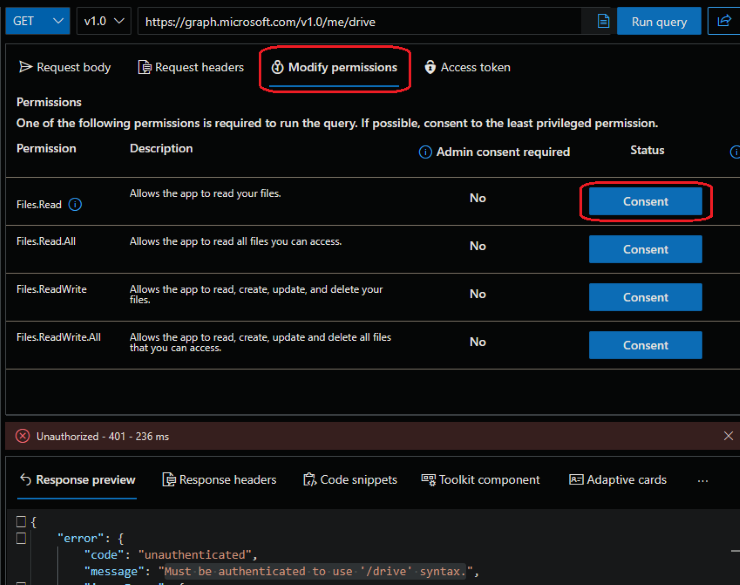
For drive_id, I found the easiest way is to use the Microsoft Graph Explorer. There you’ll log in (by default you’ll see mock data), and execute the query https://graph.microsoft.com/v1.0/me/drive. The first time you do this you’ll see an error that says Unauthorized - 401. You can easily grant access to Graph Explorer by clicking the “Modify permissions” tab and consenting to Files.Read.
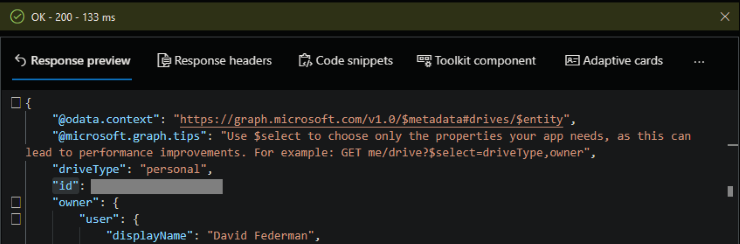
Run the query again and you should see the JSON response in the bottom pane. Use the id field of the response as your drive_id. You can also confirm that your drive_type is “personal” from the same response.
For the token, you can follow the rclone instructions but basically you just download the rclone executable from the website and run rclone authorize onedrive. This will pop up a browser window for you to authenticate in and once completed spit out JSON content which you will copy and paste in entirety into the rclone.conf. The value should be of the form: {"access_token":"...}.
Save your rclone.conf file and it’s time to create the docker container or “custom app”. Go to the Apps tab, click “Discover Apps” and then “Custom App”. I named mine “rclone-david” since again I wanted to disambiguate with another user’s rclone backups.
I found robinostlund/docker-rclone-sync on GitHub, which performs an rclone sync command on a schedule, which is exactly the scenario I’m targetting, so for the Image repository use ghcr.io/robinostlund/docker-rclone-sync.
As per the docs for that image, a few environment variables need to be set to configure it. Under the “Container Environment Variables” section, add the following environment variables:
SYNC_SRC=/rclone-data- This can be any path, as long as it matched what you use below in the Storage section.SYNC_DEST=onedrivedavid:/nas-backup- The left-hand side of the value needs to match the section header in the ini file, while the right-hand side is a path within OneDrive you’d like to back up to.CRON=0 0 * * *- To schedule the sync daily at midnight.CRON_ABORT=0 6 * * *- Schedules an abort in case the sync is taking too long.FORCE_SYNC=1- This syncs on container startup, which makes for easier testing.SYNC_OPTS=-v --create-empty-src-dirs --metadata- Additional options to pass torclone sync. These are the options I prefer, but all options can be found in the rclone docs.
Under the “Networking” section, add an interface so it can reach out to OneDrive properly.
Under the “Storage” section, add:
- Config
- Host path:
/mnt/Default/rclone, or whatever yours is configured to be. - Mount path:
/config, which is what the image expects. - Read Only: unchecked. rclone will write to the file, in particular to update the access token as it refreshes it.
- Host path:
- Data
- Host path: Whatever path on your NAS you’d like to back up
- Mount path:
/rclone-data, or whatever you chose forSYNC_SRCabove. - Read Only: checked. rclone will only need to sync from the NAS, so only need read permission to the data.
Leave everything else as the defaults and click Install. Now you’ll need to wait for the container to deploy, which may take a few moments.

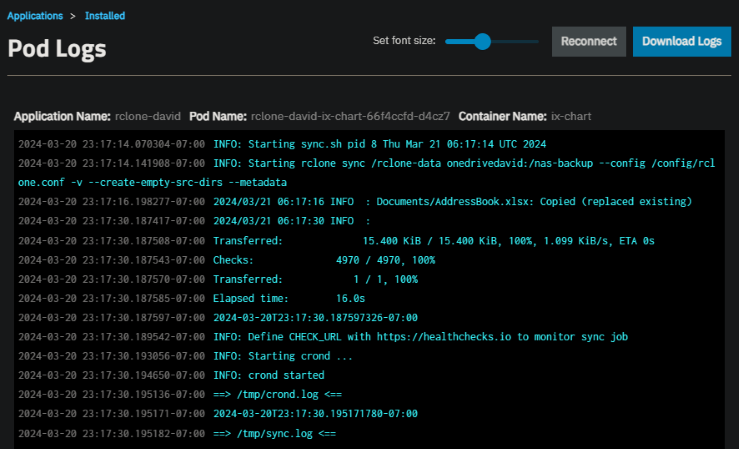
Once the container is deployed, you can click on it and under “Workloads” there should be an icon to click on to show the logs for the container. You can use this to ensure the sync is happening properly.
And that’s all there is to it! You can now have the benefits of storing your data locally in your NAS, while having the piece of mind of having a remote backup.